The Ambiance Creator is a tool that makes it easy to create soundscapes by randomly placing audio elements on the REAPER timeline according to user parameters.
Installing the Ambiance Creator
Requirements
Reaper: The package was made for Reaper 7.39+ but should work with older versions as well.
ReaPack: Used to import the package into Reaper.
ReaImGui: Used for the whole interface. It's included in the ReaTeam Extensions package, which you can install with ReaPack. To check if it's installed, you should see a ReaImGui tab under the ReaScript tab in Preferences: Options > Preferences > Plug-ins > ReaImGui.
Reapack:
To install Reapack follow these steps:
Download Reapack for your platform here(also the user Guide): Reapack Download
From REAPER: Options > Show REAPER resource path in explorer/finder
Put the downloaded file in the UserPlugins subdirectory
Restart REAPER. Done!
If you have Reapack installed go to Extensions->Reapack->Import Repositories paste the following link there and press Ok.
Then in Extensions->Reapack->Manage repositories you should see Ambiance Creator double click it and then press Install/update Ambiance Creator and choose Install all packages in this repository. It should Install without any errors.
To install ReaImGui, find ReaTeam Extensions in Manage repositories. Then if you only want ReaImGui Choose Install individual packages in this repository and find ReaImGui.
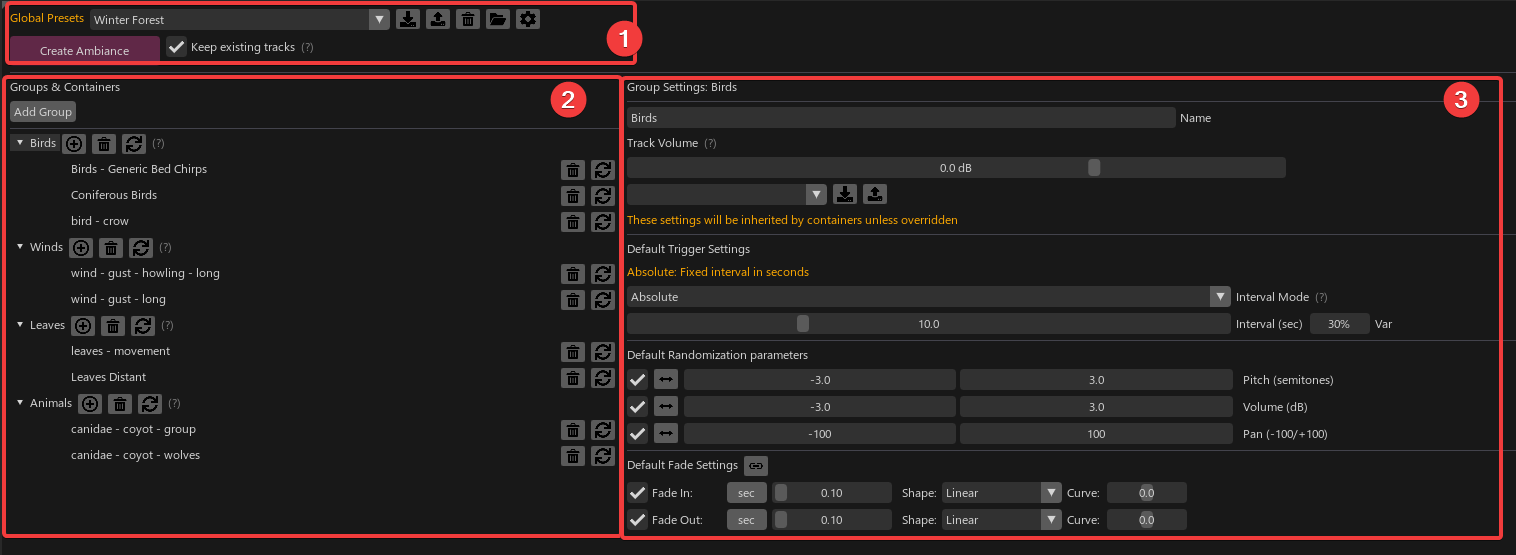
General Overview
The interface is divided into three main sections:
Global section: This is where you manage global presets, settings, and generate the whole ambiance.
Groups and containers section: This is where you organize your Groups and Containers.
Parameters section: This is where you tweak the parameters of Groups and Containers.
The tool works by defining "Groups" that contain "Containers," which group audio elements that will be randomly placed according to your parameters. This may change in the future to be even more abstract (because who doesn’t love abstraction?).
Creating/Editing Ambiances in the Ambiance Creator
The very first step is to create your own containers database. The idea is to build a collection of modules (containers) that can be reused over and over. There’s no “right way” to organize groups and containers, but here’s a suggestion.
Let’s say you want to create a Winter Forest. There are lots of different forest types, but all forests are made of two things: fauna and flora. Let’s break these down further:
Fauna: Birds, Insects, Canidae, ...
Flora: Leaves, Branches, Grass, Bushes, ...
You might also want to add a third generic category:
Winds: Strong, Soft, Howling, Gust, ...
Now that we’ve divided our forest into smaller categories, let’s create our first group:
Press the "Add group" button.
Name the newly created group "Birds".
We'll discuss the parameters later, let’s focus on containers for now.
In the Birds group, press the "Add containers" button to create your first container.
Name it "Birds - Generic Bed Chirps".
IMPORTANT NOTE: The following steps are needed only once per new container.
Now that we have the beginning of a hierarchy, we need to create the assets that will be used to build the ambiance. So let’s find our best generic bird chirps sound and add them into the session.
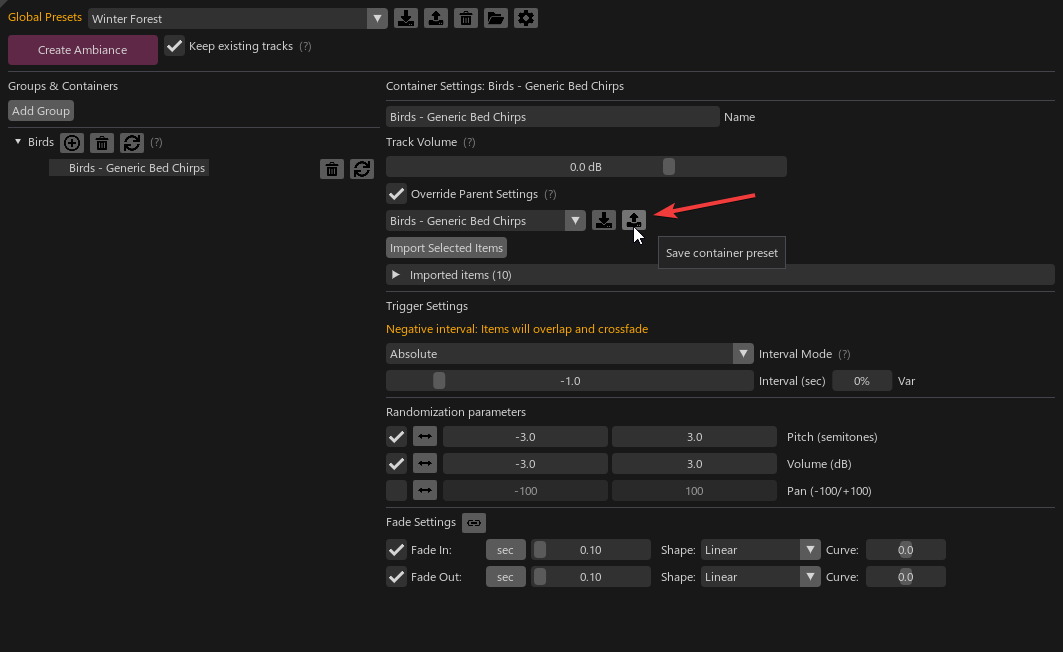
Here I took a nice generic bed of birds. The file is 1'40 long. I could keep it as one single file, but I chose to split it into 10 parts—you’ll see why later. Select your items and make sure that the "Birds - Generic Bed Chirps" container is also selected, then press "Import Selected Items" in the right panel.
You should now see all the imported items in the list:
Save Presets
Depending on your workflow, this might be a good moment to save this container. You haven’t set any parameters yet, but it contains files that can be recalled and tweaked later.
Let’s see how the preset system works.
When you save a preset, the path of the imported files is saved. By default, Reaper imports your media items into a 'Media Files' directory, located at the project’s root. This means that by default, the item’s path is this directory. It’s not a problem. BUT! If you delete this folder or the entire project folder, the reference to the item will be lost. In the Settings, you can choose a Media Item Directory. By default, this field is empty. Once you set a location, all media files will be copied to this directory when you save a preset (if they don’t already exist). This means you’ll have all your file references in the same place. Convenient!
Now that you’ve set up your Media File Directory, it’s time to press the "Save Container" button. By default, it will be named as the container. Feel free to change the name as you wish.
Note: You can find all your preset files into a dedicated folder accessible by pressing the "Open Preset Directory" button.
If you work in a team and everyone uses the same directory, it means the preset can be shared and used by anyone with access to this shared directory.
Note again: It’s not planned to create a customizable "Preset Directory" because it means anyone could delete/override a shared preset. It’s better to keep presets user-side. Share them carefully.
Parameters
Now it’s time to customize our container. If you’re familiar with audio middleware, it’s the same logic. The concept is to define some parameters to give a specific behavior to a container. Both Groups and Containers have parameters. Containers inherit from their parent group by default. Depending on the nature of your group, it can be good practice to first set a global rule for trigger and random settings. But for now, let’s create some specific behavior for our bed of birds.
Select the "Birds - Generic Bed Chirps" container and check the "Override Parent Settings" box. The parameters will appear.
Here is a quick explanation of each parameters:
Trigger Settings
The tool offers six interval modes for maximum creative flexibility:
1. Absolute Mode
Fixed interval in seconds (can be negative to create overlaps)
Interval: Time between items in seconds
Random variation (%): Percentage of random variation applied to the interval
Pitch Range: Variation range in semitones (e.g., -3 to +3)
Randomize Volume: Enables volume randomization
Volume Range: Variation range in dB (e.g., -3 to +3)
Randomize Pan: Enables pan randomization
Pan Range: Variation range from -100 to +100
The tool is meant to create ambiances of any length. If the total length is 20 minutes but your file is only 1 minute long, it will be copied 20 times. If you remember, I split the 1'40 long file into 10 pieces. Let’s roll 2d20 and take advantage of that.
Choose the "Absolute" mode and set the interval to a negative value. This value will be the length of the overlap between each item. Let’s say we want a 1-second overlap, so set the interval to -1 second. We don’t need any variation for this value, so set it to 0%.
Pitch and Volume are up to you. I’ll leave these at their default values. However, since our bed is supposed to be the foundation of the ambiance, let’s disable random pan.
Your container should look like this:
You can save the container as a preset now if you wish. Keep in mind that with the same preset name, the previous one will be overwritten. Feel free to rename it if you want to have both a raw and a tweaked version.
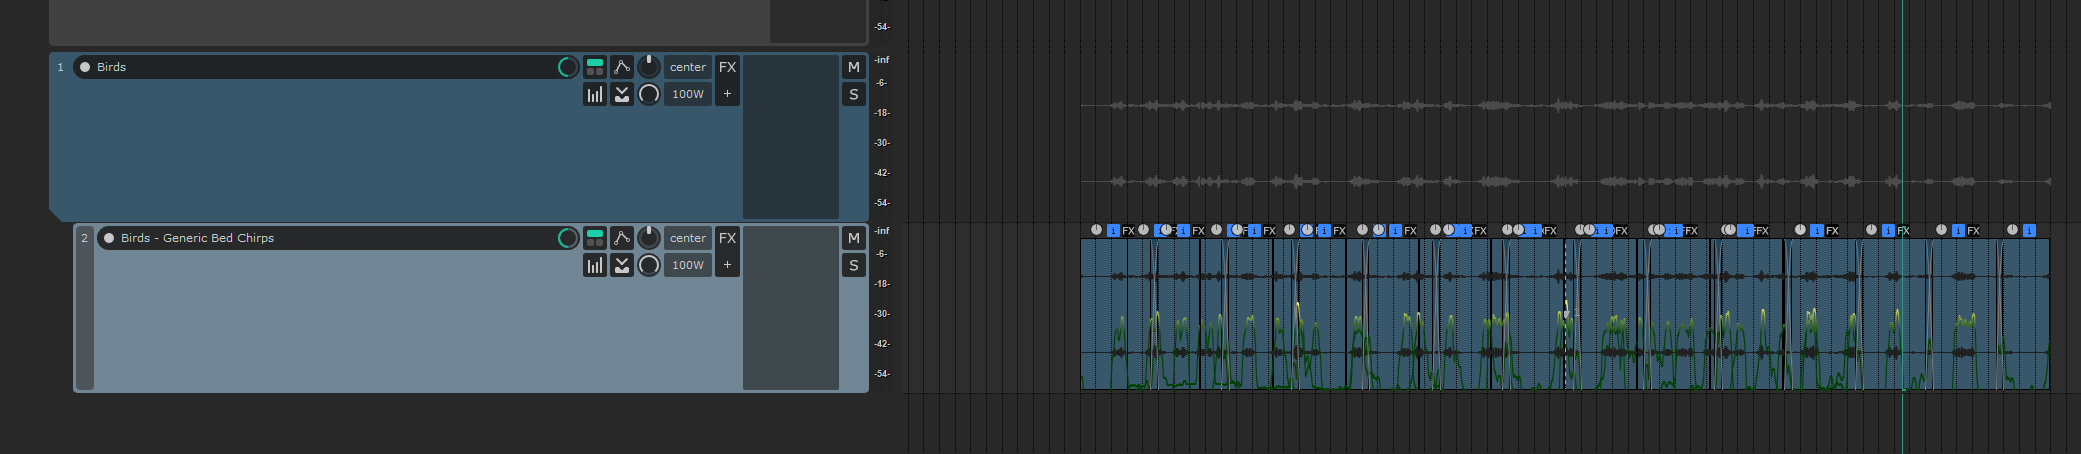
Now it’s time to test these parameters. Create a time selection on the Reaper timeline of the desired size. You’ll see that the previous "No time selection, please create one" message has turned into a "Create Ambiance" button with an option next to it. We’ll discuss this option in a second. Press the "Create Ambiance" button.
Congratulation ! You’ve created your first bed with the tool o//
You’ll notice that the track structure matches the Group/Container. Each item are placed randomly, overlaps the next with a 1-second crossfade, and the last item has been trimmed precisely at the end of the time selection.
Each item has its own pitch and volume.
If you're not satisfied with the result, you can change the parameters and press the "Regenerate" button next to the container. You can also regenerate a whole group or the whole ambiance. It's up to you. Your call. Your decision. Trust yourself.
With the "Override existing tracks" checkbox enabled, the track structure will be preserved on each regeneration, no matter the source (Global, Groups, or Container). This is handy if you’ve already tweaked your track volume, pan, FX, etc., and want to keep that but just change the content. If you change the time selection, only that time selection will be generated. If there’s content in the time selection, it will be deleted and regenerated. The new content will be crossfaded with what’s outside the time selection. The length of this crossfade can be set in the Settings.
If "Override existing tracks" is disabled, the tracks will be deleted and recreated each time you Generate (It's still local. So if you regenerate only 1 container, only the track related to this container will be deleted/created.)
Tadaaaa
All right, that's the whole loop! Now let's populate our database, play around with the parameters to create reusable containers and modular ambiances! Once you're done, you can save the whole structure as one single preset "Winter Forest" that can be recalled at any time. You can also save the groups to reuse them in other contexts, or just use the containers to manually build another type of ambiance. The possibilities are endless.
Advanced Features
Euclidean Rhythm System
Want to create complex rhythmic patterns? The Euclidean Rhythm System lets you distribute items according to mathematical rhythm patterns.
Instead of using traditional interval modes (Absolute, Relative, Coverage), you can switch to Euclidean Mode to create polyrhythmic ambiances.
Key features:
Multi-layer rhythm generation: Stack multiple euclidean patterns on top of each other
Visual preview: See your rhythm pattern before generating
Pattern library: Access famous traditional rhythm patterns from around the world
Auto-bind mode: Synchronize child layers with parent patterns
Rotation control: Shift patterns to create variations
Visual indicators: See which containers need regeneration
Smart updates: Only regenerates what changed
Toggle on/off: Disable when experimenting, enable for final tweaks
Export System
Export your generated items to the timeline for use in game audio middleware or further editing.
The Export feature allows you to create multiple instances of your generated ambiance elements, perfect for extracting variations to use in audio middleware like Wwise or FMOD.
Export Options:
Instance Count: Number of copies to create (1-100)
Spacing: Time between each exported instance in seconds
Target Track: Export to current track or create a new dedicated track
Preserve Settings: Keep or reset pan, volume, and pitch randomization
Region Creation:
Optionally create REAPER regions during export
One region per container, spanning all exported items
Customizable naming pattern with tag system:
$container - Container name
$group - Parent group name
$index - Instance number
Example: "sfx_$container" → "sfx_Rain Drops"
Multi-Container Support:
Select multiple containers (Ctrl+Click) before exporting
All selected containers are exported with the same settings
Each container creates its own track and region (if enabled)
Perfect for:
Extracting variations for game audio middleware
Creating asset libraries from generated ambiances
Preparing stems for linear post-production
Settings
You can also customize the interface in the Settings.
Quick Reference Guide
Keyboard Shortcuts:
Ctrl+C - Copy selected group or container(s)
Ctrl+V - Paste copied group or container(s)
Ctrl+Z - Undo last action
Ctrl+Shift+Z - Redo action
Space - Play/pause from current position (in waveform editor)
Shift+Click+Drag - Create new area on waveform (upper half)
Ctrl+Click - Delete area on waveform (upper half)
Linked Faders Control (Override Link Mode):
Ctrl+Drag - Force "Link" mode (move min/max together)
Shift+Drag - Force "Mirror" mode (mirror values around zero)
Alt+Drag - Force "Unlink" mode (move independently)
Override the button-defined link mode temporarily while dragging
Shift+Click - Range selection (select all containers between anchor and current)
Works with copy/paste, drag & drop, and batch operations
Advanced UI Interactions:
Fade Controls:
Click label - Toggle between seconds (sec) and percentage (%)
Drag fade curve - Adjust fade shape interactively
Right-click fade - Choose from predefined slope presets
Pitch Controls:
Click "Pitch" label - Switch to "Stretch" mode (time-stretching instead of pitch-shifting)
Click "Stretch" label - Switch back to "Pitch" mode
Waveform Editor Interaction:
Upper Half - Area manipulation (create, resize, move, delete)
Lower Half - Playback control (click to jump, drag to scrub)
Click area edges - Resize area boundaries
Click area center - Move entire area
Mouse wheel - Zoom in/out
Middle-click+Drag - Pan through waveform
Drag & Drop:
Drag containers between groups
Drag groups to reorder
Drag audio files from Media Explorer directly into containers
Drag items from REAPER timeline into containers
Multi-container drag support (select multiple, drag any one)
Generation Tips:
Use Coverage Mode for consistent sound density
Use Euclidean Mode for rhythmic patterns
Use Noise Mode for organic, natural-sounding distributions
Use Auto Detect split mode for field recordings with natural silences
Enable Auto-Regeneration for real-time parameter tweaking
Planned future additions:
If you have any feature suggestion, please fill this form.
Preview Listening for Containers/Groups: A new function will enable you to preview the sound of a container or an entire group directly within the interface before generating it in REAPER, saving time in the creative process.
Flexible Group Generation Options: The ability to generate content into a new group, a specific existing group chosen from a list, or directly into the currently selected group, providing more workflow flexibility and integration with existing projects.
Action List: Adds some Reaper actions to manipulate containers outside of the tool interface.
Middleware API: Directly create Random or Sequence containers from the tool in your preferred audio middleware.
Ambisonic Support: Extend multi-channel support to include ambisonic formats for spatial audio.
Known Issues
Please, if y ou have any issue, report it through this form.
Change log
0.16.1-beta (Export Region Creation)
New Features:
Export: Add option to create REAPER regions during export
One region per container, spanning all exported items
Customizable region name pattern with tag system
Supported tags: $container, $group, $index
Example: "sfx_$container" → "sfx_Rain Drops"
0.16.0-beta (Export Feature)
New Features:
Export modal for exporting generated items to timeline
Control instance count and spacing between exported instances
Choose to export on current track or create new track
Preserve or reset pan, volume, and pitch settings
Multi-container selection support for batch export
0.10.0-beta (Major Feature Release)
New Features:
Euclidean Rhythm System with multi-layer generation and pattern library
Interactive Waveform Editor with drawable zones and playback
Complete Undo/Redo System with history window
Multi-Channel Audio Support (Quad, 5.0, 7.0 surround with ITU/SMPTE)
Channel Volume Controls with per-channel management
Noise Generation Mode with visual preview
Folder/Group Hierarchy with path-based organization