The Unreal Mixing Interface (or UMI for short), is a console-style mixing interface which interfaces both with UE Audio's submix hierarchy as well as with the Audio Modulation plugin. Allowing you to mix with all of your faders in the same place, as well as with meters showcasing the levels in realtime.

Download the plugin through the Demute Unreal Toolkit. For UMI, make sure you have the Audio Modulation Plugin added to your project. If you don't just go to Edit>Plugins, then search for Audio Modulation and click on the checkbox to add it to your project.
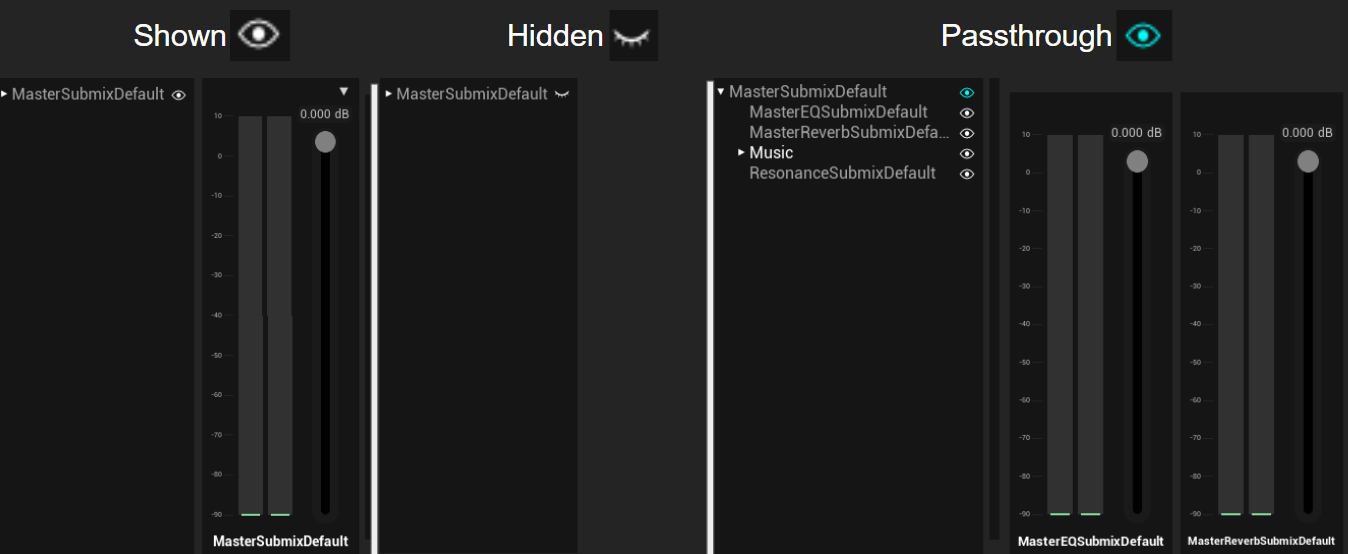
When you launch UMI, the tool will automatically list your entire submix hierarchy on the left of the interface. This left panel will be refered to as the Submix List. The layout of your list will be mirrored in the Mixing Console in the center of the interface. Each meter and fader pair in the mixing console will be refered to as a Mixing Strip. You can unfurl a submix with children (called Parent Submix) by either clicking them in the list, or pressing the arrow on the individual mixing strips. Additionally, double-clicking on a submix in the submix list will open the corresponding uasset.

Using the fader on the mixing strips immediately changes the value of the corresponding submix uasset in realtime, making the change immediately audioble. All changes to these levels are only made permanent when the submix uassets are saved. If you did not save them by hand, make sure to save changes when closing the editor after your mixing session when prompted by the engine. Additionally, instead of moving the fader, you can directly type values by clicking on the number above the fader instead (only type the number, as clicking on the value does not select the negative sign).

For each submix in the submix list, you can find an eye icon, which you can click on to change how the submix's mixing strip is displayed. The first two states are shown, and hidden. If a parent submix is hidden, so will all their children. Parent submixes also have a third state, represented by a blue eye, called Passthrough. In this state, the parent submix will collapse, only showing it's children but not itself. You can use these states to customize your view for specific mixing sessions.
UMI integrates with the Audio Modulation plugin to give you better control over your Control Bus Mixes (or CBM for short). The tool in it's current version does not help you create your control bus mixes, your control buses, and linking them to submixes, however it will allow you to tweak all of your control bus values for each active mix all in the interface. Please follow another guide for setting up the audio modulation plugin within your project.
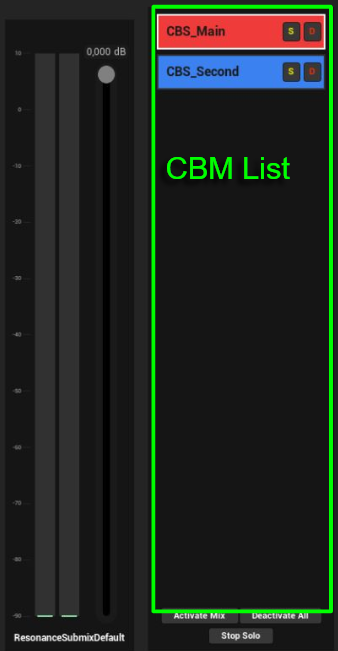
The panel on the right of the interface is called the CBM List and it will show all of your active Control Bus Mixes while you are playing the game. At the bottom of the interface, you can also activate a control bus mix temporarily for your mixing session. Each CBM in the list has two buttons, allowing you to solo mixes, and to deactivate them. You can also find two buttons at the bottom of the interface to deactivate all active mixes, and to stop the current solo. Additionally, you can double-click a CBM in the list to open the corresponding uasset.
Clicking on one of the active CBMs will select it, you can only have one CBM selected at a time. Selecting a CBM is what allows you to change it's control bus values. Control Bus Mixes have a list of control buses each linked to submixes. When you select a CBM, the mixing strips of the linked submixes will change to the CBM's color, and the fader will no longer control the submix's level, but rather the value of the Control Bus that is influencing that submix when the mix is active. Again, these changes will only become permanent when the control bus mix uasset is saved.
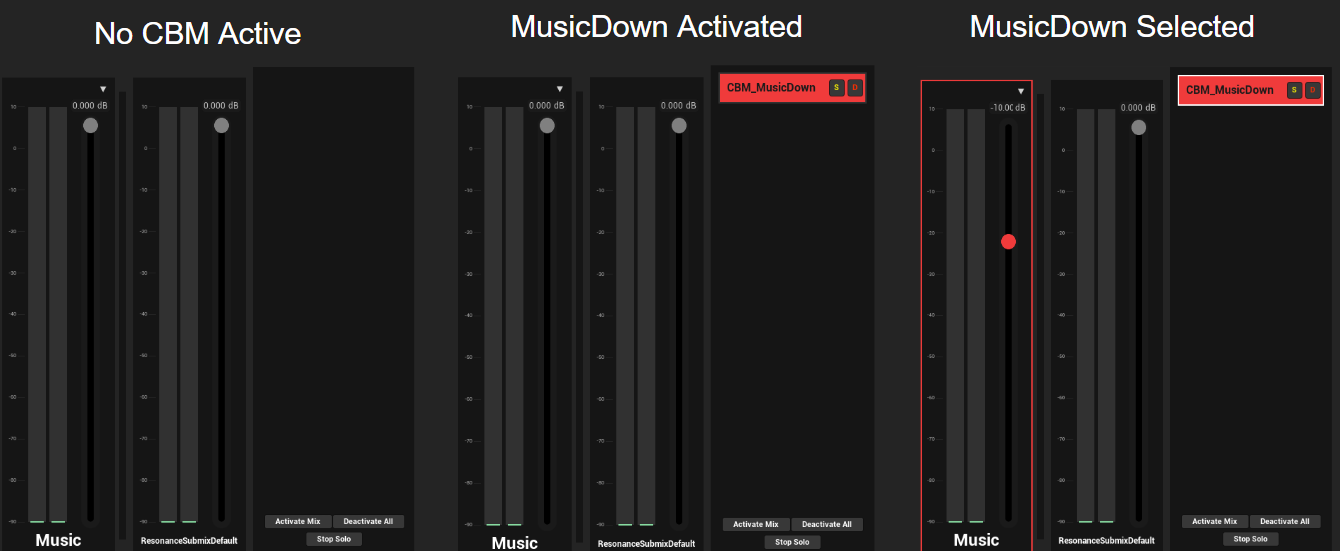
As you can see in the image above, when CBM_MusicDown is selected, the submix Music changes color and it's fader value changes, indicating that we are now controlling the Control Bus level. The ResonanceSubmixDefault submix is not being modulated by CBM_MusicDown and thus remains in it's normal state.