Batch Renamer

Batch renaming tool for REAPER. Rename multiple items, tracks, regions, and markers at once with live preview before applying changes.

Installation

  1. Install ReaPack if you don't have it already.
  2. Add the repository URL or install the script manually.
  3. In REAPER, go to Actions > Show action list, search for DM Renamer, and run DM_RENAMER_Main.lua.

Requirement: ReaImGui (installed automatically via ReaPack dependency).

Optional (recommended): SWS Extension โ€” enables region/marker click-selection from the arrange view.

โ€

โ€

Getting Started

  1. Open the script from the REAPER Actions menu.
  2. Select a tab matching what you want to rename (e.g., Media Items, Tracks).
  3. Type in the Find field, and optionally the Replace field.
  4. Watch the Preview Table update in real time.
  5. Check the items you want to rename (changed items are auto-checked).
  6. Click Apply Changes at the bottom of the window.

โ€

โ€

Interface Overview

The window is divided into several sections:

Menu Bar

  • Settings > Appearance Settings โ€” Open the theme/color editor.
  • Settings > Reset to Defaults โ€” Restore all appearance settings to defaults.

Presets Bar

Located below the menu bar, visible on all tabs. Contains:

  • Load Preset dropdown โ€” Select a saved preset or choose -- None -- to reset.
  • Save as text field + Save button โ€” Save the current configuration as a new preset.
  • Override button โ€” Replace the currently loaded preset with the current settings (appears only when a preset is loaded).
  • Delete button โ€” Delete the currently loaded preset.
  • Settings button (right-aligned) โ€” Quick access to Appearance Settings.

Tabs

Six tabs control which type of REAPER element you rename:

Left Panel โ€” Controls

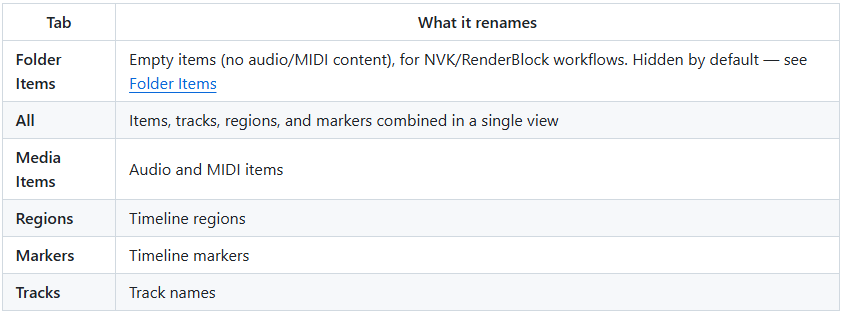
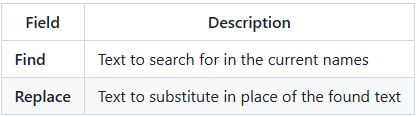
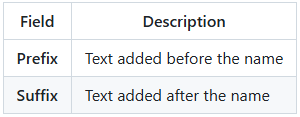
All renaming options: Find/Replace, Prefix/Suffix, Operations, Case, Replace Spaces, Increment mode, and checkboxes.

Right Panel โ€” Preview Table

A sortable table showing:

  • Checkbox โ€” Select/deselect individual items for renaming.
  • Current Name โ€” The existing name.
  • Target Name โ€” What the name will become after applying the current settings.
  • Context (Folder Items and All tabs) โ€” Shows region/track hierarchy information.
  • Type (All tab only) โ€” Shows the element type (Media Item, Folder Item, Track, Region, Marker).

โ€

โ€

Tabs in Detail

Folder Items

image

Designed for empty items (items without audio or MIDI content). These are commonly used in game audio workflows with NVK or RenderBlock setups, where empty items serve as naming containers.

Note: Items with the name or notes [JOIN] (used by the NVK suite for folder detection) are automatically excluded from the Folder Items list.

First-Time Onboarding

The first time you open the Folder Items tab, an onboarding screen appears with two choices:

  • "I'm a Folder Item user" โ€” Confirms you use this workflow. The tab stays visible and shows the full controls.
  • "Hide this tab" โ€” Hides the Folder Items tab from the tab bar. The script switches to the All tab.

If you don't use NVK-style folder items, you can safely hide this tab.

Re-enabling the Tab

image

To show the Folder Items tab again after hiding it, go to Settings (Ctrl+, or the Settings button) and check "Show Folder Items tab" under the Folder Items Tab section.

Tab Controls

Once confirmed, this tab has its own dedicated controls at the top of the left panel:

  • Pattern โ€” Choose a naming pattern (Simple, Hierarchical, Custom).
  • Separator โ€” Choose the character between name parts.
  • Custom pattern field โ€” Visible when "Custom pattern" is selected. See Folder Items โ€” Advanced Usage for full details.

All

image

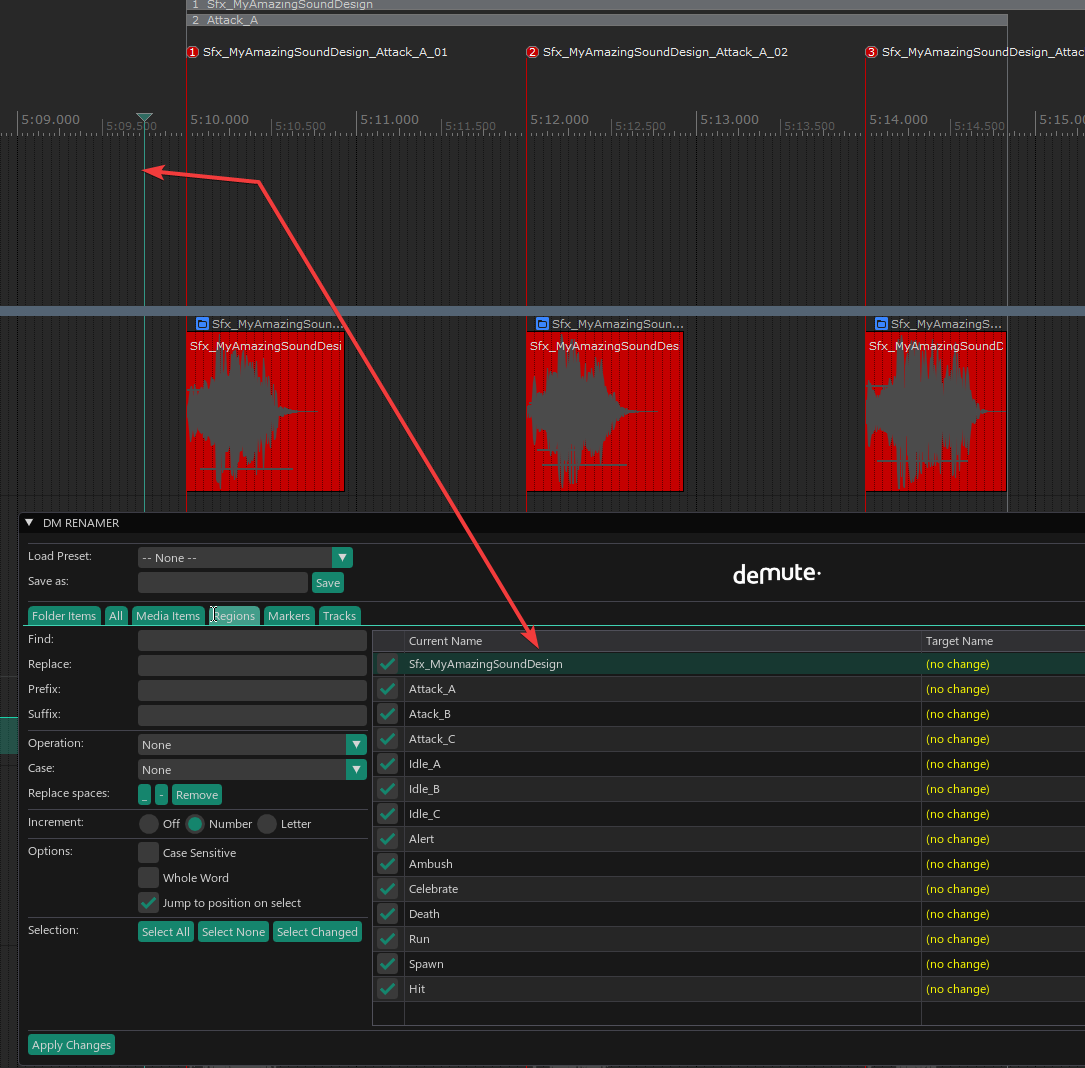
Displays every renamable element in a single list. The table includes a Type column with color-coded labels and a Context column.

  • Green: Media Item
  • Magenta: Folder Item
  • Cyan: Region
  • Yellow: Marker
  • Orange: Track

Media Items

image

Shows all audio/MIDI items. Respects the current selection and time selection.

Regions

image

Shows timeline regions. Supports selection via time selection or through the companion selection script (see Companion Scripts).

Markers

image

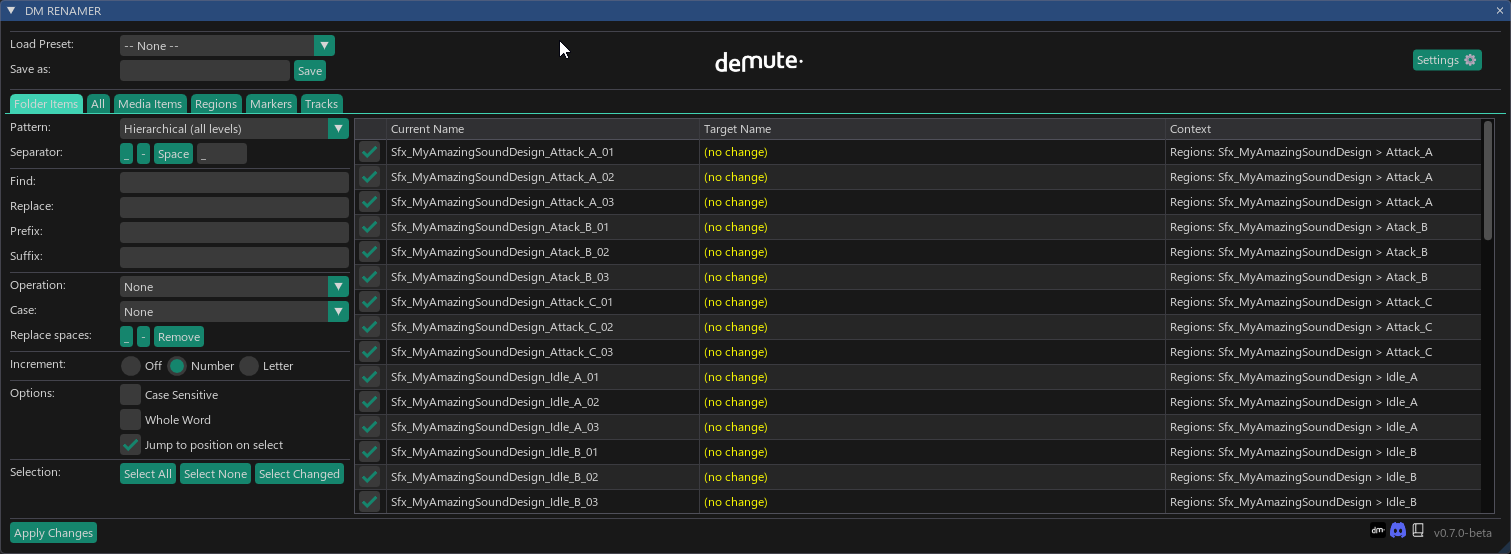
Shows timeline markers. Same selection behavior as Regions.

Tracks

image

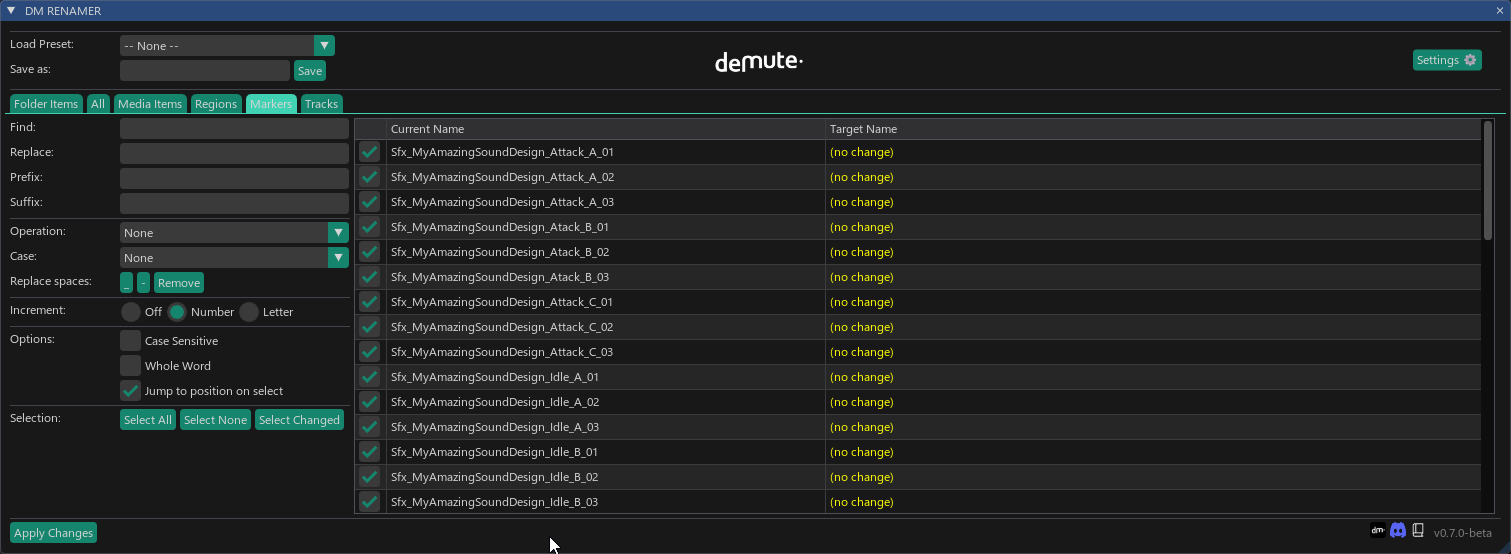
Shows all tracks. Respects the current track selection in REAPER.

โ€

โ€

Renaming Controls

All controls below are available on every tab. They stack โ€” you can combine Find/Replace with a Case transformation and a Prefix at the same time.

Find and Replace

image

The preview updates automatically as you type.

Prefix and Suffix

image

Operations

image

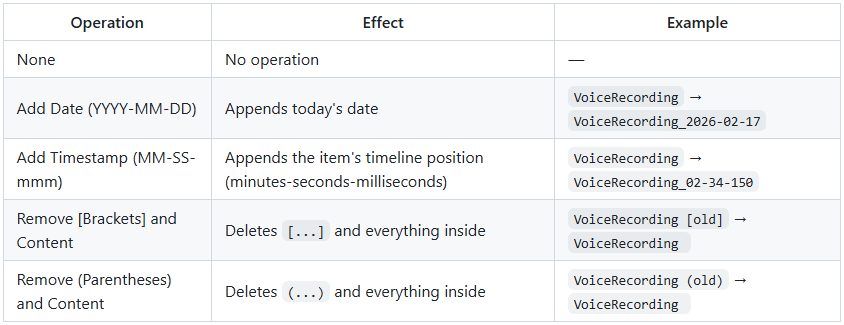
A dropdown with quick transformations. Select one from the list:

Case Transformations

image

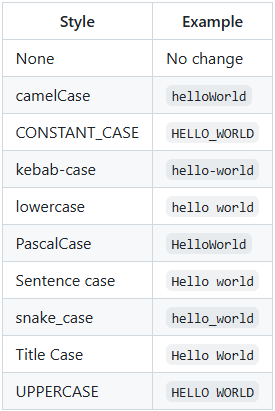
A dropdown to transform the case of all names:

Replace Spaces

image

Three toggle buttons to replace spaces in all names:

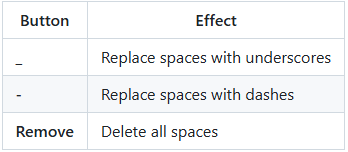
Click the active button again to toggle it off.

Increment Mode

image

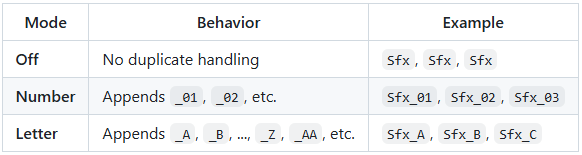
Handles duplicate names by appending a suffix. Choose one:

โ€

โ€

Options

image

โ€

โ€

Working with the Preview Table

image

Selecting Items

image

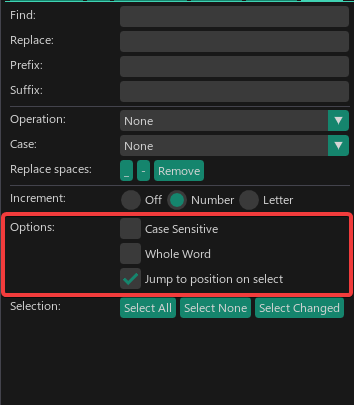
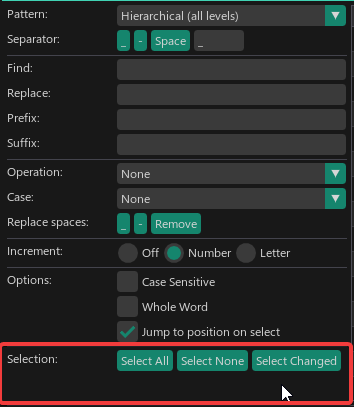
Three buttons below the options section control which items are checked:

  • Select All โ€” Check every item in the list.
  • Select None โ€” Uncheck every item.
  • Select Changed โ€” Check only items where the target name differs from the current name.

Items with changes are automatically checked when you modify any renaming parameter.

Inline Editing

image

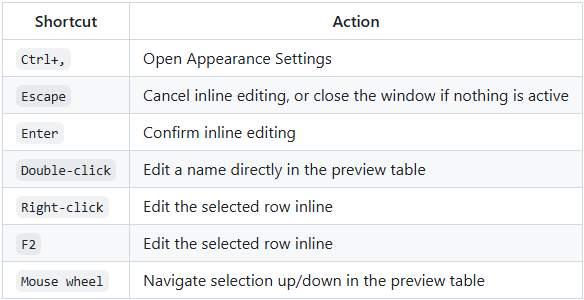
Double-click any name in the Current Name or Target Name column to edit it directly. Press Enter to confirm or Escape to cancel.

  • Editing a Current Name renames the item immediately.
  • Editing a Target Name sets a custom preview name for that item.

Sorting Columns

image

Click any column header (Current Name, Target Name, Context, Type) to sort the list. Click again to toggle ascending/descending. A โ–ฒ or โ–ผ indicator shows the current sort direction.

Jump to Position

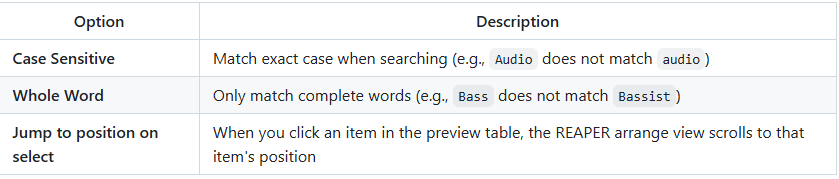
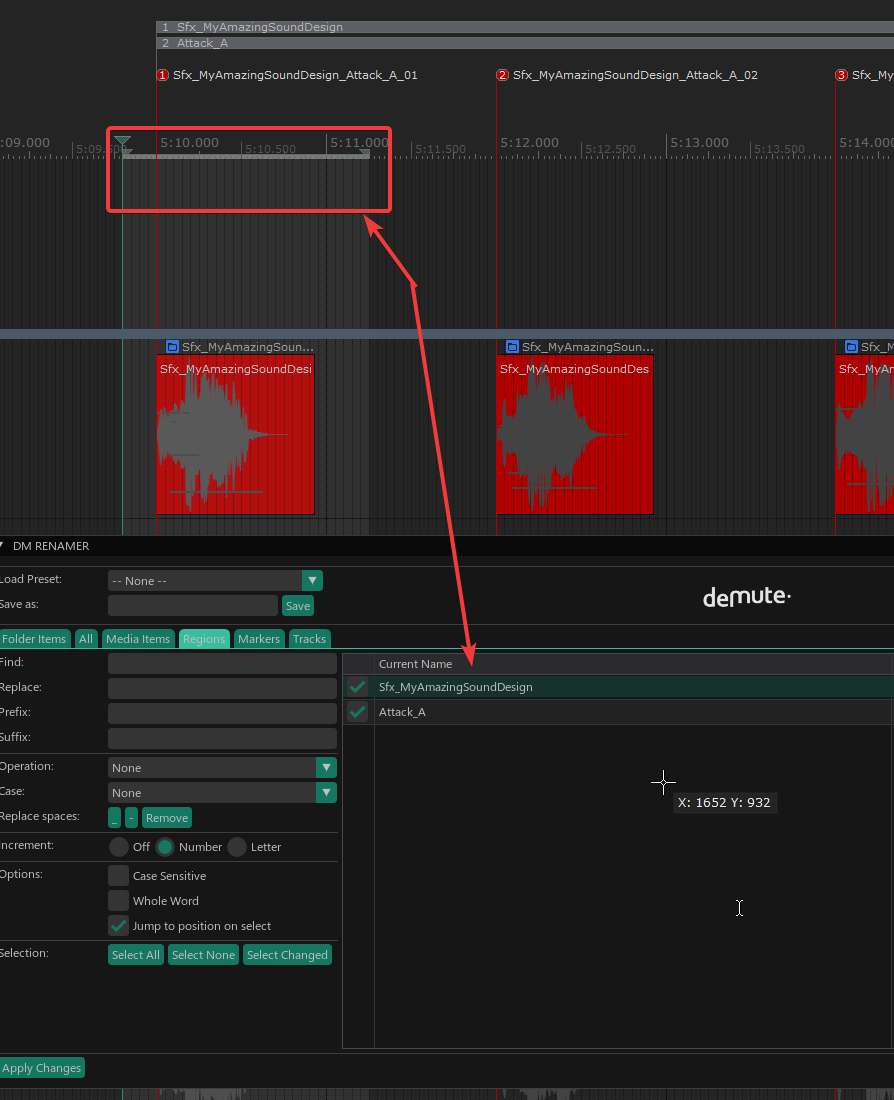
When Jump to position on select is enabled, clicking a row in the preview table moves the REAPER arrange view to that element's timeline position.

reaper_XPwV3yLuHa_1

โ€

โ€

Presets

image

Presets save your entire renaming configuration so you can reuse it later.

What a Preset Saves

  • Find/Replace text
  • Case sensitivity, Whole word settings
  • Operation selection
  • Case transformation
  • Prefix and Suffix
  • Increment mode
  • Space replacement mode
  • Folder Items pattern, separator, and custom pattern
  • Exclude tags
  • Jump to position setting

How to Use Presets

  1. Save: Configure your settings, type a name in the "Save as" field, click Save.
  2. Load: Select a preset from the "Load Preset" dropdown. All settings are restored.
  3. Override: Modify settings while a preset is loaded, then click Override to update it.
  4. Delete: Select a preset, click Delete to remove it.
  5. Clear: Select -- None -- from the dropdown to reset all fields to defaults.

Presets are stored in REAPER's Data directory (<REAPER Resource Path>/Data/DM_RENAMER_Presets.dat), so they survive script updates.

The last used preset is automatically restored when you reopen the script.

โ€

โ€

Folder Items โ€” Advanced Usage

Naming Patterns

image

Custom Pattern Variables

image

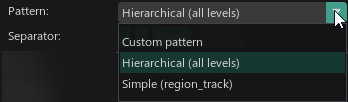
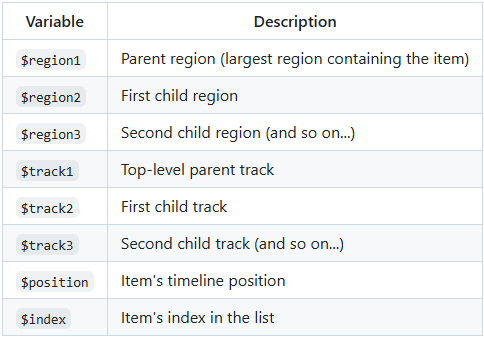
When you select the Custom pattern mode, you build a naming template using these variables:
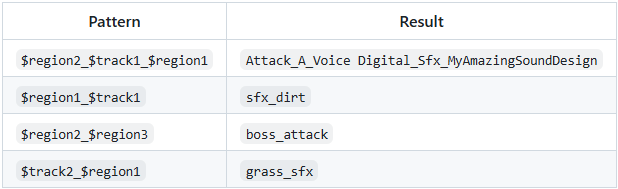
Examples:

image

Separator Options

image

Choose the character that joins name parts:

  • _ (underscore) โ€” default
  • - (dash)
  • (space)
  • Any custom text typed in the separator field

โ€

โ€

Exclude Tags

image

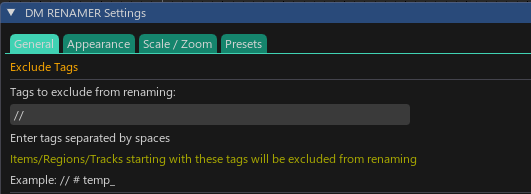
Enter space-separated tags in the Settings window under Exclude Tags. Any item, region, or track whose name starts with one of these tags is excluded from the renaming list.

Example: If you set exclude tags to TEMP OLD SKIP, then:

  • TEMP_Guitar โ€” excluded
  • OLD_Bass โ€” excluded
  • SKIP_Drums โ€” excluded
  • My_Guitar โ€” included
image

Here the track //MIX is not include in the Folder Item name because the exclude tag is //

โ€

โ€

Selection Behavior

Each tab displays all elements of its own type:

  • Media Items shows all media items in the project.
  • Tracks shows all tracks.
  • Regions shows all regions.
  • Markers shows all markers.
  • Folder Items shows all empty items.
  • All shows everything combined.

Time selection acts as a filter: when a time selection is active, only the elements that overlap with it are shown. Remove the time selection to see everything again.

image
image

For Media Items and Folder Items, selecting specific items in REAPER also acts as a filter โ€” only those selected items appear in the list.

image

For Tracks, selecting specific tracks in REAPER filters the list to those tracks only.

Note: Individual selection does not work natively for Regions and Markers โ€” REAPER does not expose region/marker selection to scripts. Use a time selection to filter them, or use the companion selection script as a workaround.

โ€

โ€

Appearance Settings

Open via Settings > Appearance Settings or Ctrl+, or the Settings button.

The Settings window has four tabs and action buttons at the bottom: Save & Close, Apply, Cancel (restores original values), and Reset Defaults.

General Tab

  • Exclude Tags โ€” Space-separated tags to exclude from renaming (see Exclude Tags).
  • Show Folder Items tab โ€” Toggle visibility of the Folder Items tab. Useful if you don't use NVK/RenderBlock workflows.

Appearance Tab

Colors

  • Button Color โ€” Primary accent color for buttons, tabs, checkboxes, and sliders.
  • Button Hover Color โ€” Auto-computed from Button Color, but individually adjustable.
  • Background Color โ€” Window background.
  • Highlight Color โ€” Auto-computed from Button Color, but individually adjustable.
  • Text Color โ€” All text in the interface.
  • Header Color โ€” Column headers and section titles.
  • Frame Color โ€” Input field backgrounds.

Style

  • UI Elements Rounding โ€” Corner radius for buttons and inputs.
  • Window Rounding โ€” Corner radius for the window frame.
  • Item Spacing โ€” Vertical space between UI elements.
  • Window Padding โ€” Margin inside the window edges.

Scale / Zoom Tab

  • UI Scale โ€” Overall interface scale (50%โ€“200%), with quick preset buttons: 50%, 75%, 100%, 125%, 150%.
  • Font Size โ€” Base font size (requires restarting the script to take effect).

Presets Tab

Four built-in appearance themes you can apply with one click:

  • Dark Theme โ€” Dark background with teal accents.
  • Light Theme โ€” Light background with neutral tones.
  • High Contrast โ€” Black background with high-visibility elements.
  • Blue Theme โ€” Navy background with blue accents.

โ€

โ€

Companion Scripts

Two additional scripts are included for region/marker selection in the arrange view:

Setup: In REAPER, go to Actions > Show action list, find these scripts, and assign them to a keyboard shortcut or mouse modifier.

These scripts work best with the SWS Extension installed (Shift multi-select, precise region/marker detection). Without SWS, a fallback mode uses the cursor position for single-selection only.

โ€

โ€

Keyboard Shortcuts

โ€

โ€

Common Workflows

Clean Up Imported Session Names

  1. Open the Media Items or Tracks tab.
  2. Set Find to the unwanted prefix (e.g., Track ).
  3. Leave Replace empty.
  4. Set Case to Title Case.
  5. Set Replace Spaces to _.
  6. Click Apply Changes.

Before: Track 01 - raw GUITAR โ†’ After: Raw_Guitar

Add Sequential Numbers to Tracks

  1. Open the Tracks tab.
  2. Set Prefix to a numbering prefix (e.g., 01_).
  3. Or use Find with empty, Replace with empty, and Increment Mode set to Number โ€” all tracks get unique _01, _02 suffixes.

Remove Take Numbers from Items

  1. Open the Media Items tab.
  2. Set Find to ( and Replace to empty โ€” removes content like (1), (2).
  3. Or use the Remove (Parentheses) and Content operation.

Before: Guitar (1) โ†’ After: Guitar

Prepare Stems for Export

  1. Open the Tracks tab.
  2. Set Case to UPPERCASE.
  3. Set Replace spaces to _.
  4. Set Prefix to your project name (e.g., MyProject_).
  5. Click Apply Changes.

Before: lead vocals โ†’ After: MyProject_LEAD_VOCALS

Name Folder Items for Game Audio

  1. Create regions in your timeline (e.g., SFX, Music, VO).
  2. Organize tracks in folders (e.g., Footsteps > Dirt, Footsteps > Grass).
  3. Open the Folder Items tab.
  4. Select Hierarchical pattern.
  5. Set the separator to _.
  6. Click Apply Changes.

Result: SFX_Footsteps_Dirt, SFX_Footsteps_Grass

Custom Patterns for Complex Game Audio Hierarchies

Imagine a project structured like this:

Regions (nested):
ย โ”œโ”€โ”€ Level01 ย  ย  ย  ย  ย  ย  ย โ† $region1 (parent, largest)
ย โ”‚ ย  โ”œโ”€โ”€ Forest ย  ย  ย  ย  ย  โ† $region2
ย โ”‚ ย  โ”‚ ย  โ”œโ”€โ”€ Ambiance ย  ย  โ† $region3
ย โ”‚ ย  โ”‚ ย  โ””โ”€โ”€ Combat ย  ย  ย  โ† $region3
ย โ”‚ ย  โ””โ”€โ”€ Cave ย  ย  ย  ย  ย  ย  โ† $region2

Tracks (nested):
ย โ”œโ”€โ”€ SFX ย  ย  ย  ย  ย  ย  ย  ย  ย โ† $track1 (top-level parent)
ย โ”‚ ย  โ”œโ”€โ”€ Footsteps ย  ย  ย  ย โ† $track2
ย โ”‚ ย  โ”‚ ย  โ”œโ”€โ”€ Dirt ย  ย  ย  ย  โ† $track3
ย โ”‚ ย  โ”‚ ย  โ””โ”€โ”€ Stone ย  ย  ย  ย โ† $track3
ย โ”‚ ย  โ””โ”€โ”€ Impacts ย  ย  ย  ย  ย โ† $track2
ย โ”‚ ย  ย  ย  โ””โ”€โ”€ Metal ย  ย  ย  ย โ† $track3

Empty folder items sit at the intersection of a region and a track. With the Custom pattern, you control exactly which levels appear and in what order.

Goal: Name assets as Level01_Forest_Footsteps_Dirt (skip the top-level SFX category, keep the sub-region).

  1. Open the Folder Items tab.
  2. Set Pattern to Custom pattern.
  3. Enter: $region1_$region2_$track2_$track3
  4. Set Separator to _.
  5. Set Increment to Number (handles duplicates).
  6. Set Exclude Tags to TEMP BUS (skip utility tracks).
  7. Click Apply Changes.

Results:

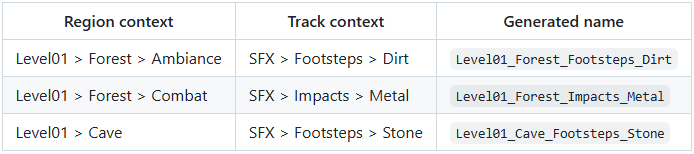
By skipping $track1 (SFX), you avoid redundant prefixes. By using $region2 instead of $region3, you pick the right nesting depth. The custom pattern gives you full control over the naming hierarchy without any manual editing.

Save this as a preset (e.g., Game Export - Level Based) to reuse it across sessions.

Save and Reuse a Configuration

  1. Set up your renaming parameters.
  2. Type a name in the "Save as" field (e.g., Game Audio Export).
  3. Click Save.
  4. Next time, select Game Audio Export from the Load Preset dropdown.

Support

For additional support you can contact us.
You can also join our public discord server at: https://discord.gg/srNFquSUtu