


ReaAnimViewer

3D animation viewer for REAPER. Load glTF and FBX animations straight onto your timeline and watch the animated character play in sync with the REAPER playhead, from any camera angle.

Installation
‍

Requirements:

  • REAPER 7.x, 64-bit, Windows
  • A graphics card supporting OpenGL 3.3 (any GPU from the last ~10 years)
  • ReaPack (for the Toolkit and ReaPack installs)

Nothing else to install. Everything the viewer needs (3D loader, UI, image decoders) is compiled inside the extension.

Already using version 0.1.x? Read Upgrading from 0.1.x first.
‍
‍

Install with the Demute Reaper Toolkit (easiest)
‍

The Demute Reaper Toolkit is our tool browser for REAPER: it lists every Demute tool and installs or updates them in one click. If you already use it, skip to step 3.

  1. Install ReaPack if you don't have it already, then restart REAPER.
  2. Install the Toolkit (one-time setup):
    1. Go to Extensions > ReaPack > Import repositories..., paste the following URL and click OK:
      https://raw.githubusercontent.com/DemuteTools/DM_ReaperToolkit/refs/heads/main/index.xml
    2. Go to Extensions > ReaPack > Manage repositories, select Demute_Toolkit and click Browse packages.
    3. Search for DM_ReaperToolkit, right-click it, choose Install, then click Apply.
  3. Open the Toolkit: Actions > Show action list, search for DM_ReaperToolkit and run it. It automatically scans for available tools and updates.
  4. Select the ReaAnimViewer card and install it.
  5. Click Run on the card. A message confirms that ReaAnimViewer is installed.
  6. Restart REAPER. Extensions are only loaded at startup.
  7. Open the viewer with the action RAV: Open Viewer, or with Run on the card.

You only need step 5 once. The Toolkit downloads scripts, while ReaAnimViewer is a native extension that REAPER loads from its UserPlugins folder: the first Run copies it there. From then on, the extension updates itself.
‍
‍

Install with ReaPack
‍

  1. Install ReaPack if you don't have it already, then restart REAPER.
  2. In REAPER, go to Extensions > ReaPack > Import repositories...
  3. Paste the following URL and click OK:
    ‍https://github.com/DemuteTools/ReaAnimViewer/raw/main/index.xml‍
  4. Go to Extensions > ReaPack > Browse packages..., search for ReaAnimViewer.
  5. Right-click ReaAnimViewer (the extension), choose Install, then click Apply. The ReaAnimViewer Launcher package is optional: it is the script used by the Demute Reaper Toolkit.‍
  6. Restart REAPER. Extensions are only loaded at startup.
  7. Check the installation: go to Actions > Show action list, search for RAV. You should see RAV: Open Viewer.

The package also installs a small RAV_Launcher script. It is used by the Toolkit; with ReaPack you don't need it (running it just opens the viewer).


Updating
‍

With the Demute Reaper Toolkit: open the Toolkit, click Update on the ReaAnimViewer card, then restart REAPER. The extension swaps itself for the new version when REAPER closes, so the new version runs after the restart. Nothing else to run.

With ReaPack: go to Extensions > ReaPack > Synchronize packages (or wait for the automatic check), click Apply, then restart REAPER so the new version is loaded.

Manual install: download the new DLL and replace the old one, as in Manual Installation.


Upgrading from 0.1.x

Version 0.1.x came as two ReaPack packages, also when you installed it through the Toolkit. Remove the old one once:

  1. Go to Extensions > ReaPack > Browse packages... and search for ReaAnimViewer.
  2. Two entries are listed. Right-click the one whose category is Extensions, choose Uninstall, then click Apply. Keep the one in Scripts.
  3. Restart REAPER, then run Extensions > ReaPack > Synchronize packages and click Apply.
  4. Restart REAPER again.

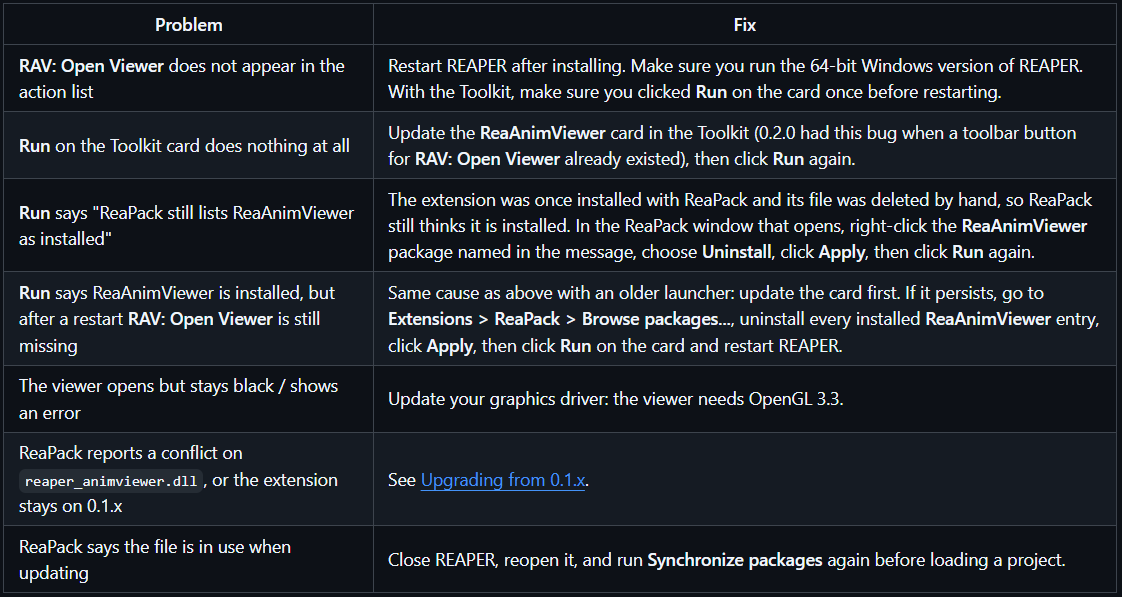
Until you do this, ReaPack reports a conflict on reaper_animviewer.dll and ReaAnimViewer stays on 0.1.x.


‍

Uninstalling
‍

With ReaPack: go to Extensions > ReaPack > Browse packages..., right-click ReaAnimViewer, choose Uninstall, click Apply and restart REAPER. Don't delete the DLL by hand instead: ReaPack would still consider it installed (see Troubleshooting).

With the Demute Reaper Toolkit: uninstall the ReaAnimViewer card in the Toolkit, then close REAPER and delete reaper_animviewer.dll from the UserPlugins folder.

Manual install: close REAPER and delete reaper_animviewer.dll from the UserPlugins folder.

To find the UserPlugins folder: in REAPER, Options > Show REAPER resource path in explorer/finder (usually %APPDATA%\REAPER\UserPlugins\). Files named reaper_animviewer.dll.old or .new next to it are leftovers of an update and can be deleted too.


‍

Manual Installation
‍

If you can't use ReaPack:

  1. Download reaper_animviewer.dll from the latest release.
  2. Close REAPER.
  3. In REAPER, Options > Show REAPER resource path in explorer/finder shows you the right folder. Copy the DLL into its UserPlugins subfolder (usually %APPDATA%\REAPER\UserPlugins\).
  4. Start REAPER and look for RAV: Open Viewer in the action list.

A manual install does not update itself: repeat these steps for each new version.
‍

Troubleshooting
‍


Getting Started
‍

  1. Open the viewer: Actions > Show action list, search RAV, run RAV: Open Viewer. Dock it wherever you like, REAPER remembers the position.
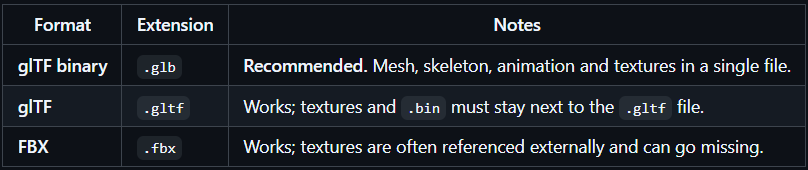
  2. Drag a .glb, .gltf or .fbx file from Windows Explorer onto a track. An item is created with the exact length of the animation.
  3. Move the playhead over the item: the character appears in the viewer, posed at that frame.
  4. Press Play. The animation runs in sync with the transport: scrub, loop and stop as you would with a video.
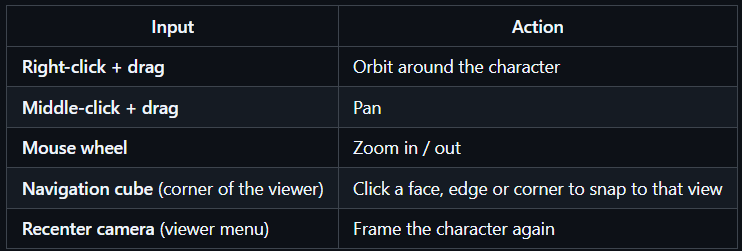
  5. Right-click and drag in the viewer to turn around the character. Start placing your sounds.

Tip: bind RAV: Open Viewer to a key or toolbar button to toggle the viewer quickly.

‍

Supported Files

‍

Each file should contain one skinned mesh and its animation. Animations built at runtime in the engine (state machines, blend trees, runtime IK) must be baked into the exported file. VFX, particles and engine shaders are not rendered.

‍

Camera Controls

‍

‍


Viewer Menu


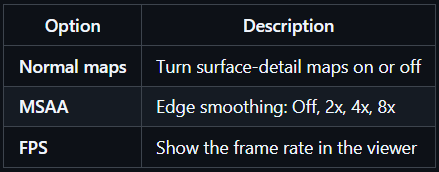
Click the menu icon in the top-left corner of the viewer to show or hide the tool menu.
‍

Light
‍

  • Colour: Colour of the main light.
  • Position: Drag in the pad to move the light around the character.
  • Ambient: Fill light. Lower it for more contrast.
  • Specular: Strength of the shine on surfaces.
  • Relief: Strength of the normal maps (surface detail).

‍

Ground
‍

  • Enable: Show or hide the floor and grid under the character.

‍

Shadow
‍

  • Off / Low / Mid / High: Quality of the shadow cast on the floor. Off is the lightest for your GPU.
    ‍

Performance
‍


If the viewer feels slow on a laptop, lower MSAA and Shadow first.


‍

Working with Animation Items
‍

Animation items behave like regular REAPER media items:

  • Move them to realign the animation with your sounds.
  • Trim the start or end to show only part of the animation.
  • Loop an item by extending it past its end.
  • Put animations on several tracks: when items overlap under the playhead, the viewer shows the one on the topmost track.

Animation items produce no audio: you can place them on the same tracks as your sounds or on a dedicated "Anim" track.


‍
‍

Saving and Sharing Projects
‍

  • The viewer state (items, docked window position) is saved with your REAPER project and restored when you reopen it.
  • To send a session to a colleague, use File > Save project as... with Copy all media into project directory: the animation files are copied with the audio, and the project opens on another machine without re-importing anything.
  • When the animator delivers a new export, replace the file on disk (same name) and reopen the project: your items and sounds stay in place.


‍
‍

Exporting Animations from Your Engine
‍

See Exporting animations from Unreal Engine 5 for a step-by-step guide to producing a clean .glb (mesh + textures + one animation).

Rule of thumb: always export as glTF binary (.glb) when your engine or DCC supports it.


‍

Building from Source
‍

Only needed if you want to contribute. Users should install through ReaPack.

Prerequisites: Windows x64, Visual Studio 2022 (Desktop development with C++), CMake 3.20+, Git.

git clone https://github.com/DemuteTools/ReaAnimViewer.git
cd ReaAnimViewer
build.bat

build.bat compiles the extension and installs it into REAPER (close REAPER first). Output: build/Release/reaper_animviewer.dll. Third-party dependencies are either vendored in extern/ or fetched and statically linked by CMake (see extern/VENDORED.md).

Build options, releases and the ReaPack workflow are documented in MAINTAINING.md.


‍

License
‍

MIT, see LICENSE.md.

Released free for the game audio community by Demute Studio.

For additional support you can contact us.
You can also join our public discord server at: https://discord.gg/srNFquSUtu